
How to make a good Photoshop selection
One
of the key skills when using Photoshop is definitely knowing how to make good
selections on your images. Have you ever seen the typical poor photo-montage
where you can clearly see that one of the pictures has been 'cut-out' like if a
child was learning how to use scissors for the first time? That's bad image
selection, and it can often mean the difference between good and bad
image-editing.


In
Photoshop there is a huge range of selection tools and options you can choose
from, ranging from very basic to quite complex, depending on what you're trying
to do. Below are some of the ones available and a short description of what
they do. (I have also added the command in brackets, as these can become
extremely useful to learn if you are wanting to cut down on time.)
From
top to bottom on the tool bar:
- Lasso Tool (L) - This tool has three variables:
- Lasso Tool
(basic) - allows you to draw your selection boundaries freely.
- Polygonal
Lasso Tool - allows you to draw in straight lines forming polygonal
shapes.
- Magnetic
Lasso Tool - is used just like the previous tool, except that it
automatically snaps to the edge of the shapes on your image. (This can
prove to be a much quicker option for images that have clearly defined
and contrasted shapes; however if not so, the magnetic tool can become
very inaccurate.)
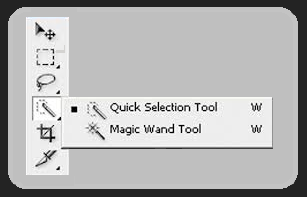
- Magic Wand
(W) - This is one of the most popular selection tools, and also has two
variables:
- Magic Wand
Tool - selects areas of a similar tone.
- Quick Selection Tool - selects are of similar texture or appearance.
- Tolerance
- this value determines how similar the tone or texture has to be from
the area clicked on to be included in the selection. The larger the
tolerance, the bigger the difference can be. (For example, selecting
something red with a small tolerance, will select a very specific tone
of red and nothing else; whereas selecting something red with a large
tolerance could potentially also select light red, dark red, reddish
orange and reddish pink.)
- Anti-alias
- selecting this option will slightly soften the borders of your
selection, giving it a less 'pixeled' appearance.
- Contiguous
- selecting this option will ensure that the tones or textures you are
selecting are connected. (Un-ticking this option can allow a faster
selection when a general tone is to be selected throughout the image.)
- Sample
all layers - selecting this option will allow your tool to select pixels
from all layers at the same time.
- Selecting using vector shapes - Pen Tool (P) & Custom Shape Tool (U):
- These tools
and their variables are not generally used as selection tools, however
the more complex shapes or presets available can sometimes be very useful
to convert into a selection.
- To do this,
just draw your shape, and then in the 'Paths' menu, right-click on your
shape and choose "Make selection".
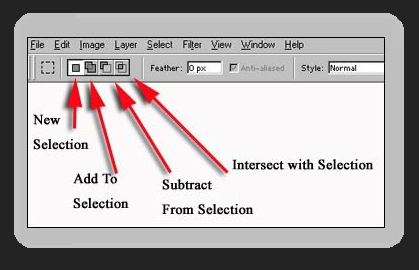
- Modifying
your selection - The options can be grouped into three main actions, and
can be found in the 'Select' menu:
- Adding:
- Add
- To add to your selection, simply hold down the Ctrl key whilst using
any of the selection tools.
- Expand
- Allows you to expand your selection by a determined number of pixels,
whilst maintaining the original shape.
- Grow
- Will include all adjacent pixels falling within the tolerance range of
your selection.
- Similar
- This option works a bit like un-ticking the 'Contiguous' option, as it
will select similar tones / textures regardless of whether they are connected
or not in the image.
- Border
- Will select a border of a determined number of pixels around your
original selection.
- Subtracting:
- Subtract
- To subtract from your selection, simply hold down the Alt key whilst
using any of the selection tools.
- Contract
- Allows you to contract your selection by a determined number of
pixels, whilst maintaining the original shape.
- Effects:
- Feather
- Softens the edges of your selection giving them a gradual transition
to transparency. The feather value will determine how many pixels around
the edge the feathering will affect.
- Smooth
- Slightly simplifies and smoothes the selection line.
- Invert
- Selects the opposite pixels, all the ones that were unselected
previously.
- Transform
selection - This option allows you to use the 'Free Transform' options
(scale, perspective, distortion, etc) directly on the selection line,
without affecting the image behind.
- Saving your
selection - Once you have managed to make your selection, you can save it
into Photoshop, going to menu Select > Save Selection, and load it
again with Load Selection. This way you won't have to go through the whole
process more than once.
This
covers most of the options available, however I'm sure there could be more, as
after using Photoshop for about 10 years I still learn something new each time!
I
would definitely say that the key to a good use of Photoshop is knowing your
selection tools properly, and being able to choose the most appropriate one for
the task will save you a lot of time.

_________________________________________________________________________
_________________________________________________________________________
Categories
:
Photoshop


0 comments :
Post a Comment